I recently made an example of a poly-board print for my year 8 lessons. I haven't taught poly-board printing in a while so I decided to remake it to refresh my memory, and to make a better display in class. I find it confusing making these, because of the postive-negative, and I can get confused when trying to explain it in words. I love the end results so all the confusion is worth it!
1. I began this process by making a tonal drawing - it could be done using any medium, but I did this drawing with a biro pen. I got the kids to use props ie hats, scarves, funky glasses etc (one boy even brought in a head torch to draw with), for more interesting results. They drew using mirrors which always scares them, and on top of that they had to use pens...no rubbing out!
2. Trace the drawing and tape it to the polyboard tile to hold it in place. Then, with a pin, prick the main shapes of the face through the tracing paper onto the polyboard print. This takes a while, but it's the most direct way of transferring the drawing to the polyboard without making too many pressed marks. You will need to tilt the polyboard in the light so you can see the dots, you basically then just join the dots with a very light pen line. Be careful not to press hard, as anything you press down will remain in your print.
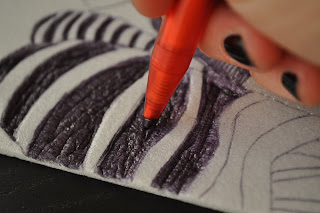
3. With a biro pen, press down all the areas that you want to appear white on your print (assuming that you are using white paper to print on). A helpful hint is to colour in the entire shape first with a layer of ink, then go back and press down harder. This seems to help the polyboard surface stay together and press down neatly. Sometimes it can spring back up, and it needs another pressing.
I find this bit confusing, as when you colour in the areas you want to be white, you are in fact, colouring them in with the ink of your biro pen. I keep repeating to the kids 'colour in the bits you want white' and they seem to get it.
In this example I am making a 2 colour print, so I began by pressing down the whitest parts only. I will then make a series of prints with a mid tone colour. Then, I will go away and press down the mid tone areas on the polyboard and using the dark colour, I will print the shapes that are left, on top of the white and midtones.
4. Once you have pressed down all the white bits, you are ready to print the mid-tones (best to choose a lighter colour, then you can print a darker colour on your 2nd layer).
This is my mid tone print. All of the areas that were pressed down on the poly-board don’t ‘catch’ the ink when the ink is rolled on the surface, and appears white (because I printed on white paper). You can also see the registration marks around the outside of the print, this is really helpful when aligning the 2nd colour print.
This is a print of the dark layer, there is no need to do a separate print of this layer, normally you would print directly ontop of the mid tone colour but I made separate prints in order to better explain it to the students.
I pressed down all the areas apart from the darkest parts. I also added a textured background…I’m not sure about the background but it’s another technique to show the students. On some of my other colour examples, I cut the background off with a craft knife, and only printed the face.
Here is the finished print with the dark layer printed on top of the mid tone.
Here is the display that I have put up in my classroom. I find it a lot easier to explain the 2 layer printing process, when there are examples to point at. More often than not, it’s me who gets confused when explaining it in words, and the students are totally getting it!
I made lots of colour variations when I was making this example. It’s a good idea to make 3 or 4 prints of your first colour so that you can make multiple prints – should anything go wrong or if you want to experiment with different colour combinations. The other thing I should have said is that you should be sure to register the print on the paper by drawing a pencil line around the polyboard, this is so that the students get perfect alignment when they do the 2nd print.
Happy printing!


4 comments:
This looks like a great technique to try. Looking forward to giving it a go, your prints are beautiful!
Great set of tips from the master himself. Excellent ideas. Anyone wishing to take their blogging forward must read these tips. Thank you .PolyBoard 7.04b Crack + Keygen Latest Version Free Download
http://web.imim.mcu.edu.tw/zh-hant/node/1111
http://mountainguide-sibiu.ro/index.php/en/forum/donec-eu-elit/35239-volcano-merapi-tool-crack-free-download?start=6
http://www.tangotiger.de/forum/viewtopic.php?f=26&t=36980&p=69477#p69477
http://forum.echo.or.id/forum/viewtopic.php?f=18&t=62653&p=634773&sid=dc21538e1b5521e3c5eb008298cb95bf#p634773
http://web.imim.mcu.edu.tw/zh-hant/node/1110
http://web.imim.mcu.edu.tw/zh-hant/node/1109
Thank you very much for sharing. Your work is very inspiring.
Post a Comment