Monday, 30 May 2011

Bird Lino Prints

Here are some more lino bird prints from my student placement...
I made these into a small booklet which I photocopied and gave to each of the students.  It was a mini illustration project so it was nice to give the students a little present after all their hard work!


Portrait Drawings

This is a photo of one of my displays in my room.  It's the year 10 drawings.  Tonal pencil drawings and an oil pastel study using hot and cold colours.

Charcoal Portraits

These are some charcoal drawings done by my year 10 class.  They started by covering their page with charcoal and worked in reverse by rubbing away the lighter areas with a putty rubber, then using charcoal and chalk for details. 

Bird Drawings - Year 11s

We recently bought some stuffed birds in the art department.  They are such a great resource to have and drawings are so much better done from life than from a photo.  These are drawings done by my year 11 class this year.


Charcoal & Chalk Eyes

The large ey drawings done by my year 10 class.  I started the year off by doing these, as it is quite an easy drawing technique and the results are fantastic in my opinion.  It also gets them to consider detail very carefully.
I also did this drawing lesson when I was doing my teacher training placement in Glasgow.  This is the work from 2nd year students, I gave them the choice to draw any feature of their face. 

Flower Drawings

Some lovely flower drawings done by my year 7 classes...

Fish Drawings - Experimenting with Materials

This was a fun technique to teach! 
I gave the students charcoal, ink, paint, cardboard strips, glue spreaders and told them to experiment with mixing different materials together.  I gave them images of fish to choose from, and got them to focus on creating different textures and patterns.  The students really got excited with the experimenting ! I have these on display in my room and I love them – they are all so different. 


Sea Life Drawings

Some research drawings done by the year 9s as part of their sea life project.  These are water colour pencils on black paper.  The water colour pencils are much softer than regular pencils and give a much bolder result.

Shoe Drawings

Some tonal pencil drawings of shoes done by the year 8s before making their Bug Shoe Designs.  Shoes are one of my favourite things to draw!

Charcoal Drawings of Karl Blossfeldt images

Using the beautiful photography of Karl Blossfeldt, the year 7s made these charcoal drawings.  I got them to work in reverse by covering their paper with charcoal first.  Using putty rubbers they took away the white areas and left the darker areas.  They used charcoal and white chalk for fine details, and to acheive a wide range of tone.  I love this technique as it is really fun, messy and if the students make a mistake, they just rub some charcoal over the top.     

Mosque Prints

These are a couple of example prints that I made using polyboard.  Last year we had a couple of ‘taster’ days in June for the new year 7s who would be starting in September.  In the art department we came up with this quick and easy print.  There were some lovely results – but sadly I didn’t take any photos of the students’ work before they took them away.  It was such a success that we are going to do this same lesson for this years’ taster days, so I will try and take some photos then.    

Flower Paintings - Georgia O'Keefe Style

Here are the Georgia O'Keefe inspired flower paintings, done by the year 7s.


Flower Silk Paintings

Some examples of flower silk paintings done by the year 7s.  They look lovely and colourful all displayed together!


You can add salt crystals to the silk after you have applied the inks.  The salt creates a lovely pattern, which this boy has used on his thistle...


Puppets

Last year, the year 7s made puppets as part of their textiles project.  The Art department got together with the English department and we found out that they were actually reading Shakespeare’s The Tempest, and so the idea for puppets came about.  All of the year 7s had done in depth character studies, so they were very inspired and each had a favourite one that they wanted to make into a puppet.
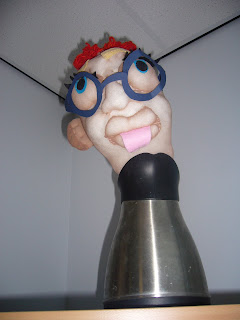
I had seen some really fun heads made at Stirling High School using nylon tights (see below for their pictures), and we developed this idea but on a smaller scale for our puppets. 
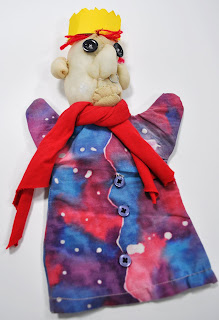
Students began the project by decorating their puppet’s body.  We had pre-cut 2 body templates for each student out of a large white bed sheet.  They used batik technique to decorate the cotton, then once the wax had been ironed off, the students sewed their bodies together on the sewing machines, but left a hole at the neck, where the head would be inserted.
We then set about making the heads.  You will need a pair of tights (any colour), some thread, a needle, stuffing, buttons, beads, wool and anything else you might want to add for hair etc.  I started by getting the students to make the noses.  With your thumb and finger, pinch a nose shape and secure this in place with a needle and thread.  The more you stitch, the more shapes you can form on the face.  The lips are done in the same way.  For the eyes, there are lots of different options, you can add buttons, or add small blobs of fabric.  For the hair you can use wool, fabric, fluffy stuff – anything!  It's all about experimenting.  The ears are separate shapes that I stitched separately, then stitched them to the head.
Once the heads were finished, you insert half a toilet roll for the neck, and tape these together.  This neck then inserts into the fabric body, and using a hot glue gun, the heads are stuck in place.
My trials and examples.....
Using different sizes of buttons makes a funny wee face!  I also stitched some orange beads for freckles.

In this example I added an extra bit of stuffed nylon for the lips, which I stitched into for texture.  The eyes are done in a similar way - for a more bulbous look!

A head that has been glued to the body.  I think this guy looks like a real thug!  It is very easy to make quite ugly looking characters, and much trickier to get cute and pretty looking ones.

For the hair on this one, I glued strips of scrap fabrics.

And I gave her some little sparkly freckles, and small bits of fabric behind the buttons for eyes.
Here are some different bodies that I trialled using batik.  I drew some extra details on some of mine using fabric markers.
I gave this cheeky chap a little scarf and a goatee, for some extra character.

 
Some of the pupils' work...


I got the idea for the puppet heads from the art department at Stirling High school, when I worked there.  They had made these but much larger...I just love them!